How to Remove Angelfish Eggs From the Tank: Methods, Benefits, and Risks

Fish owners will have different methods for removing angelfish eggs from their tanks. Some more common methods include using a net, using a spoon, or picking them up with your fingers. In addition, the techniques may vary depending on the type of angelfish or if any eggs have been laid.
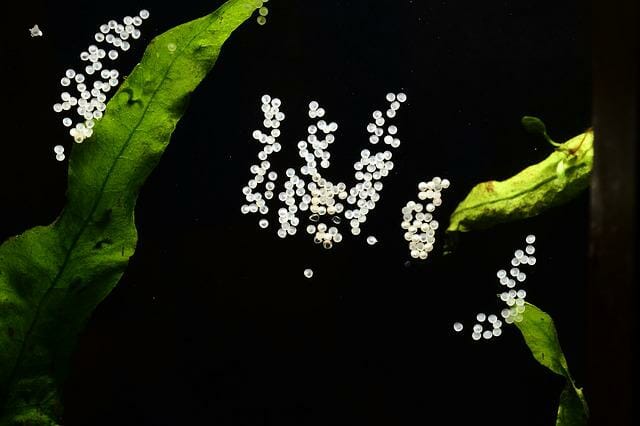
The following basic information should be considered before taking any action; Once you discover an egg has dropped into the aquarium, there is no way to remove it other than waiting for a hatchling to emerge. This can take months and even years, so patience is essential! The mother will continue guarding its newly formed home until all four eggs hatch simultaneously or one of them breaks and the fry can escape.
If eggs are found near the top of the tank, likely, the mother angelfish have already deposited them there. In this case, you can gently try to net the eggs or gently use a spoon to gently remove them from their hiding place. If any eggs are stuck in hard-to-reach areas, use your fingers to peel them off of the substrate carefully.
Table of Contents
Is It a Good Idea to Remove Angelfish Eggs?
Moving angelfish eggs is a common practice among fish keepers. However, before you do so, it is essential to understand the risks and rewards of raising young angelfish in captivity. If all goes well, you’ll end up with a new generation of angelfish waiting for you when you get home.
However, there are a few things to keep in mind before you take the plunge. First, follow the instructions your breeder provided carefully, and everything should go smoothly. Young fish in captivity is not ideal, and it’s essential to make sure you know what you’re doing before taking this step. So, before you decide to move your angelfish eggs, make sure to do your research first.
What Do You Need to Know Before Removing Angelfish Eggs?
Moving the angelfish eggs can be a great idea if you want to add new angelfish to your aquarium. Make sure you have the correct container and enough water for them, and do not move them during the day as they will be stressed out. After you’ve prepared the aquarium and filled it with water, it’s time to hatch the eggs. Follow these simple steps to ensure a successful hatch:
- Light: angelfish eggs need light to hatch, so ensure there are at least a few watts of light coming into the aquarium from above.
- Temperature: angelfish eggs need warm water to hatch, so ensure the water is around 80 to 82 degrees Fahrenheit.
- Space: angelfish eggs need room to grow, so ensure the aquarium has at least 20 gallons or more extensive water.
- Food: Once the angelfish eggs have hatched, you will need to provide them with food and water. Feed them small pieces of live or frozen larvae once a day and ensure they have access to an adequate water supply at all times.
Once the eggs hatch into baby angels, they will love swimming around and exploring their new home. Additionally, Angelfish will eat any algae, food, and other parasites that may be growing in the aquarium. If there’s too much growth inside the tank, you can remove some of it through siphoning.
What to Do After Removing Angelfish Eggs?
It’s important to know that angelfish eggs must be removed before they hatch, as they will spawn and overwhelm the tank. After removing the eggs, it is crucial to decide what to do with them. There are a few options available – you can keep them in a tank or release them into the wild. Make sure to consult with an expert before making any decisions – it can be risky if done wrong! Additionally, your aquarium should be cleaned and disinfected after removing the eggs to prevent any chance of disease.
Why Is It Important to Remove the Angelfish Eggs?
It is crucial to remove the angelfish eggs before they hatch, as this will prevent any problems from arising. Removing the eggs prevents the fish from reproducing in their natural habitat and ensures that they live a happy and healthy life. Moreover, by moving the eggs, you risk creating chaos and confusion among the fish, which can have long-term consequences. The best time to remove the angelfish eggs is during the early stages of development when they are still in their egg capsules. Do not forget to keep a close eye on them so that everything goes smoothly for your angelfish. Hair algae can also be removed in the same manner as angelfish eggs.
What Are the Risks of Removing Angelfish Eggs From a Tank?
The risks of removing angelfish eggs from a tank include the eggs becoming lost or swallowed by another fish, the eggs taking up space that you could use for breeding and spawning, and the eggs hatching before they are expected to spawn in the aquarium. In addition, you can carry over the eggs of other, less desirable species, which could cause unwanted problems.
What Are the Best Ways to Remove Angelfish Eggs From a Tank?
There are a few ways to remove angelfish eggs from a tank, but the most common is using a sponge. Additionally, this method would need to be used multiple times to succeed, as each time, the angelfish eggs will develop further and become harder for the sponge used on various occasions.
Furthermore, some male fish may arrive at a tank later than expected and breed before they are due. Therefore causes disarray among other members of the same species, which can also have long-term implications.
Is It Safe to Remove Angelfish Eggs by Hand?
It is safe to remove angelfish eggs by hand as long as the fish are not disturbed, and there is no risk of them becoming lost. However, it would be best to do this during the early stages of development when the eggs are still in their capsules. If you attempt to remove them later, they will likely be more difficult to break open and could end up in other parts of the aquarium – potentially causing problems for your angelfish.